Home >>ReactJS Tutorial >ReactJs - Environment Setup
ReactJs - Environment Setup
ReactJS - Environment Setup
We will teach you in this chapter how to set up an environment for successful development of the React.
Notice that a lot of measures steps are involved but that will help speed up the development process later. We'll need NodeJS so check the connection from the table below if you don't have it installed.
| SrNo | Software & Description |
|---|---|
| 1 | NodeJS and NPM NodeJS is the platform required for development of the ReactJS. |
After installing NodeJS successfully, we can start using npm to install React upon it. ReactJS can be built in 2 ways
- Webpack and babel are included.
- Using command create-react-app.
Installing ReactJS using webpack and babel
Webpack is a Bundler module (manages and loads separate modules). It takes dependent modules and then compiles them into a single bundle (file). Using the command line, or configuring it using webpack.config file, you can use this package when developing apps.
Babel is a compiler and transpiler on JavaScript. Used for converting one source code to another. Using this, you can use the latest ES6 features in your code where babel converts it to plain old ES5 that can be run on any browser.
Step 1 - Create the Root Folder
Build a folder called reactApp on the desktop, using the mkdir command, to install all the appropriate files.
C:\Users\username\Desktop>mkdir reactApp
C:\Users\username\Desktop>cd reactApp
It is necessary to generate package.json file to create any module. Therefore, we need to create a package.json file after Creating the folder. To do this you need to run the command npm init from the prompt.
C:\Users\username\Desktop\reactApp>npm init
This command asks for module information such as package name , description, author etc. You can skip these using the option -y.
C:\Users\username\Desktop\reactApp>npm init -y
Wrote to C:\reactApp\package.json:
{
   "name": "reactApp",
   "version": "1.0.0",
   "description": "",
   "main": "index.js",
   "scripts": {
      "test": "echo \"Error: no test specified\" && exit 1"
   },
   "keywords": [],
   "author": "",
   "license": "ISC"
}
Step 2 - install React and react dom
Because our main task is to install ReactJS, install it and its dom packages respectively, use npm's install react and react-dom commands. Using the option —save, you can add the packages we install to the.json file.
C:\Users\username\Desktop\reactApp>npm install react --save
C:\Users\username\Desktop\reactApp>npm install react-dom --save
Or, you can install them all in single commands as –
C:\Users\username\Desktop\reactApp>npm install react react-dom --save
Step 3 - Install webpack
Since we use webpack to create webpack, webpack-dev-server and webpack-cli for bundler installation.
C:\Users\username\Desktop\reactApp>npm install webpack --save
C:\Users\username\Desktop\reactApp>npm install webpack-dev-server --save
C:\Users\username\Desktop\reactApp>npm install webpack-cli --save
Or, you can install them all in single commands as –
C:\Users\username\Desktop\reactApp>npm install webpack webpack-dev-server webpack-cli --save
Step 4 - Install babel
Install babel-core, babel-loader, babel-preset-env, babel-preset-react and, html-webpack-plugin
C:\Users\username\Desktop\reactApp>npm install babel-core --save-dev
C:\Users\username\Desktop\reactApp>npm install babel-loader --save-dev
C:\Users\username\Desktop\reactApp>npm install babel-preset-env --save-dev
C:\Users\username\Desktop\reactApp>npm install babel-preset-react --save-dev
C:\Users\username\Desktop\reactApp>npm install html-webpack-plugin --save-dev
Or, you can install them all in single commands as –
C:\Users\username\Desktop\reactApp>npm install babel-core babel-loader babel-preset-env
   babel-preset-react html-webpack-plugin --save-dev
Step 5 - Create the Files
We need to create other files, namely index.html, App.js, main.js, webpack.config.js, and .babelrc, to complete the installation. You can create these files manually, or by using the prompt command
C:\Users\username\Desktop\reactApp>type nul > index.html
C:\Users\username\Desktop\reactApp>type nul > App.js
C:\Users\username\Desktop\reactApp>type nul > main.js
C:\Users\username\Desktop\reactApp>type nul > webpack.config.js
C:\Users\username\Desktop\reactApp>type nul > .babelrc
Step 6 - Set Compiler, Server and Loaders
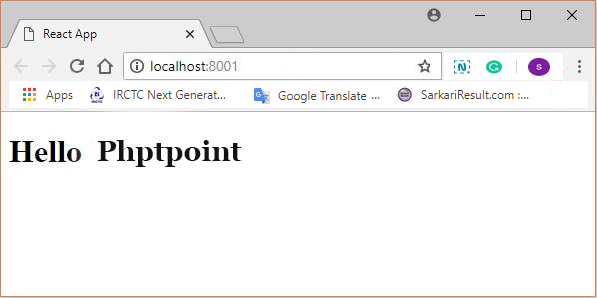
Open the file webpack-config.js, and add the code below. We set the webpack entry point as main.js. Output route is the position where bundled app is being served. We also set the development server to port 8001. You can choose whichever port you wish.
webpack.config.js
const path = require('path');
const HtmlWebpackPlugin = require('html-webpack-plugin');

module.exports = {
   entry: './main.js',
   output: {
      path: path.join(__dirname, '/bundle'),
      filename: 'index_bundle.js'
   },
   devServer: {
      inline: true,
      port: 8001
   },
   module: {
      rules: [
         {
            test: /\.jsx?$/,
            exclude: /node_modules/,
            loader: 'babel-loader',
            query: {
               presets: ['es2015', 'react']
            }
         }
      ]
   },
   plugins:[
      new HtmlWebpackPlugin({
         template: './index.html'
      })
   ]
}
Open the.json package and delete "echo\"Error" test: no test specified\ "& & exit 1" inside the object "scripts." We are deleting this line as in this tutorial we will not perform any testing. Let's add the commands start and build, instead.
"start": "webpack-dev-server --mode development --open --hot",
"build": "webpack --mode production"
Step 7 - index.html
It is nothing more than regular HTML. For our app, we set div I d = "app" as the root element and add index bundle.js script, which is our bundled app file.
<!DOCTYPE html>
<html lang = "en">
   <head>
      <meta charset = "UTF-8">
      <title>React App</title>
   </head>
   <body>
      <div id = "app"></div>
      <script src = 'index_bundle.js'></script>
   </body>
</html>
Step 8 − App.jsx and main.js
This is the first component of React. In a subsequent chapter, we will explain React components in depth. That component is going to make Hello World.
App.jsimport React, { Component } from 'react';
class App extends Component{
render(){
return(
<div>
<h1>Hello World</h1>
</div>
);
}
}
export default App;
We need to import this component into our root app element and make it, so we can see it in the browser.
main.js
import React from 'react';
import ReactDOM from 'react-dom';
import App from './App.js';
ReactDOM.render(<App />, document.getElementById('app'));
Note − You need to import it first, whenever you want to use something. If you want to make the component usable in other parts of the app, after creation you need to export it and import it into the file where you want to use it.
Create a .babelrc file and copy the following content to it.
{
   "presets":["env", "react"]
}
Step 9 - Running the Server
The setup is complete, and we can run the following command to start the server.
C:\Users\username\Desktop\reactApp>npm start
It will show the port in the browser which we need to open. That is http:/localhost:8001/ in our case. After we open it we'll see the output below.
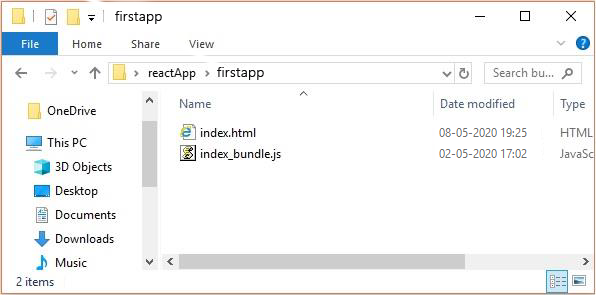
Step 10 - Generating the bundle
Finally, to create the package you must execute the build command in the prompt as –
C:\Users\username\Desktop\reactApp>npm run build
This will generate the package as shown below, in the current folder.
Using the create-react-app command
You can install ReactJS more easily by installing create-react-app instead of using the webpack and babel
Step 1 - install create-react-app
Use the command prompt to search the screen and install the Build React Program.
C:\Users\username>cd C:\Users\username\Desktop\
C:\Users\username\Desktop>npx create-react-app my-app
This will build a desktop folder called my-app and install all the necessary files in it.
Step 2 - Delete all the source files
Browse the src folder in the my-app folder created, and delete all the files in it as shown below
C:\Users\username\Desktop>cd my-app/src
C:\Users\username\Desktop\my-app\src>del *
C:\Users\username\Desktop\my-app\src\*, Are you sure (Y/N)? y
Step 3 - Add files
In the src folder add files called index.css and index.js as –
C:\Users\username\Desktop\my-app\src>type nul > index.css
C:\Users\username\Desktop\my-app\src>type nul > index.js
Add the following code to index.js file
import React from 'react';
import ReactDOM from 'react-dom';
import './index.css';
Step 4 - Run the project
Use the Start command to finally run the project.
npm start