Home >>Angular7 Tutorial >Angular7 Project Setup
Angular7 Project Setup
Angular7 Project Setup
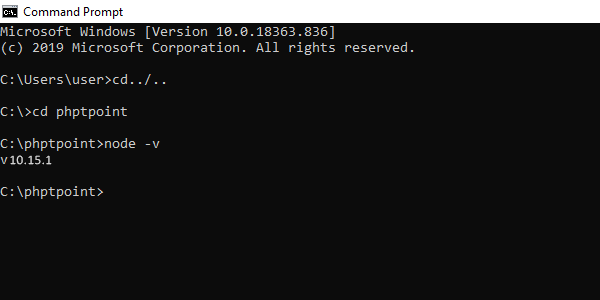
Be sure to have nodejs installed to get started with the project setup. You may use the command line to check the node version, node – v, as shown below.
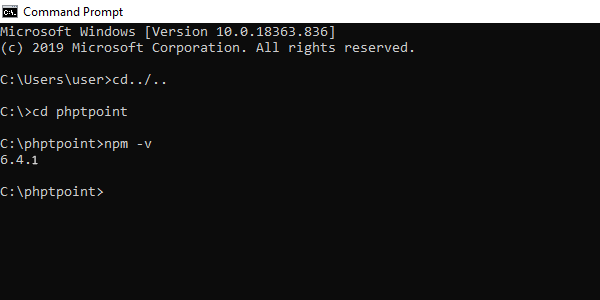
Once nodejs are installed, npm will be installed with it, too. To check the npm version, run npm -v as shown below in the command line.
You will see the following commands on the webpage –
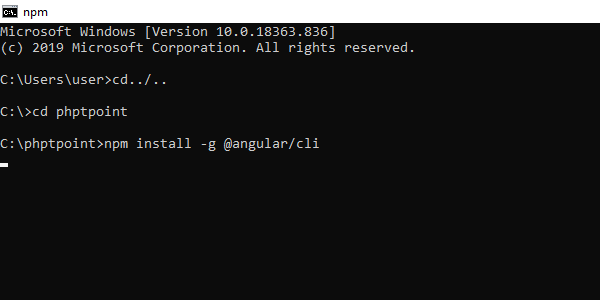
npm install -g @angular/cli //command to install angular 7
ng new my-dream-app // name of the project
cd my-dream-app
ng serve
The above commands assist in setting up the project in Angular 7.
We'll build a projectA7 folder, and install angular / cli as shown below.
We will use the following command to create a project in Angular 7-
ng new projectname
You can use your choice of projectname. Now let's run the command above in command line.
Here, the project name is used as angular7-app. Once you have executed the command, you will be asked to route as shown below.
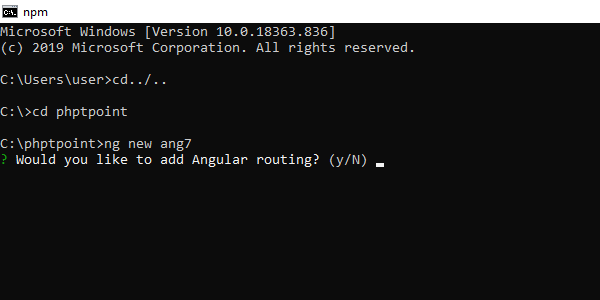
Type y to add a routing to configure your project.
The next question concerns a stylesheet –
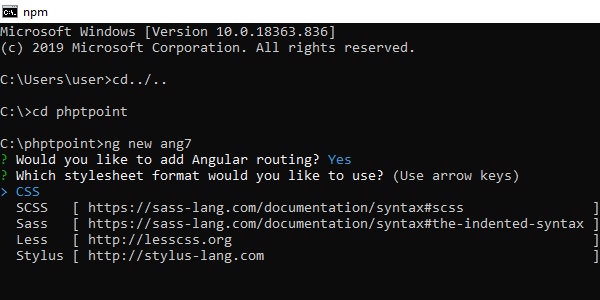
CSS, Sass, Less, and Stylus are available as options. The arrow is on CSS, in the screenshot above. To alter, you can choose the one required for your project setup using the arrow keys. We will be discussing CSS for our project-setup at the time.
The project angular7-app is successfully created. It installs all the packages required to run our project in Angular7. Let us now switch to the created project, which is in the angular7-app directory.
Change the command line directory by using the specified line of code –
cd ang7
We 're going to use Visual Studio Code IDE to work with Angular 7, you can use any IDE, such as Atom, WebStorm, etc.
Go to https:/code.visualstudio.com/ to download Visual Studio, and press Download for Windows.
To install the IDE, select Install for Windows, and run the setup to start using IDE.
Now that we have the project file structure, let's compile our project using the following command –
ng serve
Let us finalize the setup of the project. As you see we used port 4200 which is the default port used by angular – cli when compiling. You should change the port if you wish to use this command –
ng serve --host 0.0.0.0 –port 4205
The following folder structure is in the angular7-app/ folder
- E2e/-End of Test folder. E2e is primarily used for integration testing and helps to ensure that the application works fine.
- Node modules/ − Installed npm packages are node modules. You can open the folder, and see the available packages
- Src/ − This folder is where we'll be working on a project using Angular 7.Inside src/ you'll have app / folder created during the project setup and hold all the necessary project files.
The file structure for the angular7-app/ folder is −
- Angular.json − Basically contains the name of the project, the cli version etc.
- .editorconfig − This is the editor config file.
- .gitignore − To share the ignore rules with every other user copying the repository, a.gitignore file should be added to the repository.
- Package.json − The.json package file tells you which libraries to install into node modules when running npm installation.
Currently, if you open the.json file in the editor, you'll have the following modules added to it −
"@angular/animations": "~7.2.0",
"@angular/common": "~7.2.0",
"@angular/compiler": "~7.2.0",
"@angular/core": "~7.2.0",
"@angular/forms": "~7.2.0",
"@angular/platform-browser": "~7.2.0",
"@angular/platform-browser-dynamic": "~7.2.0",
"@angular/router": "~7.2.0",
"core-js": "^2.5.4",
"rxjs": "~6.3.3",
"tslib": "^1.9.0",
"zone.js": "~0.8.26"
If more libraries need to be added, you can add them here and run the npm install command.
- Tsconfig.json − This basically contains the required compiler options during compilation.
- Tslint.json − This is the config file with rules that should be considered during compiling.
The folder src/ is the main folder which has a different file structure internally.
app
It includes the following files. Those files are installed by default with angular-cli.
app.module.tsIf you open the file, you will see that the code refers to various libraries which are being imported. Angular-cli used these default import libraries: angular / core, platform browser.
The names themselves explain library usages. They are imported into variables such as statements, imports, providers and bootstrap and stored in them.
We can see the addition of app-routing.module, too. This is because at the start of the installation we had selected a routing. The add-on module is @angular / cli.
That is the file structure –
import { BrowserModule } from '@angular/platform-browser';
import { NgModule } from '@angular/core';
import { AppRoutingModule } from './app-routing.module';
import { AppComponent } from './app.component';

@NgModule({
   declarations: [
      AppComponent
   ],
   imports: [
      BrowserModule,
      AppRoutingModule
   ],
   providers: [],
   bootstrap: [AppComponent]
})
export class AppModule { }
@NgModule is imported from @angular / core and has the following properties object-
Declarations − The relation to the components is contained in statements. The App component is the default component that is created every time a new project starts up. We'll learn in another section about creating new components.
Imports − This would have imported modules as shown above. BrowserModule currently forms part of the imports that are imported from the @angular / platform-browser. AppRoutingModule is also added to routing module.
Providers − The services created will be referenced here. The service is discussed in a chapter below.
Bootstrap − The default component created, i.e. AppComponent, is referenced here.
App.component.css − Write your css down here. Right now, as shown below, we've added the background color to div.
The structure of the file is as follows −
.divdetails
{
   background-color: #ccc;
}
app.component.html
The html code will be available in this file.
The structure of the file is as follows −